Sculpted & Plated Traces
For information on electroplating please see the electroplating 101 post.
Introduction
Electroplating is a technique for coating a conductive object in a thin layer of metal. It uses electrodepositing to transfer metal ions in a solution from one electrode to another, depositing a thin layer of metal on the conductive material attached to the negative electrode of your direct power supply. This technique is used in jewelry making to plate natural objects such as leaves, flowers and seashells. Once you get the hang of it, electroplating is a very straightforward and relatively simple process. It took me some time to get a feeling for the process and all the materials but now I really like it because it allows me to sculpt three-dimensional circuits as well as include found objects such as seashells in my circuit design.
This recipe describes the process of sculpting acrylic clay, firing it and then electroplating it with copper metal to form fully functioning circuit connections, create a magnetic battery holder, shape a skin resistive switch and embed some electronic components; in my case an Atmega ATtiny85 microcontroller and some LED lights.
Step-by-step
Materials and Tools
The materials and tools used in this process can be sourced from a combination of local craft, hardware and online shops. TO begin electroplating and sculpting circuits you will need the following materials and tools.
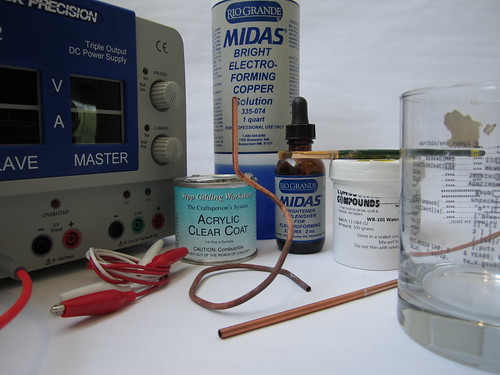
– A rectifier: A direct power supply that allows you to control the amount of voltage and current you supply. Rectifiers cost from 100$ upwards. Some models are sold specifically for plating and include Sherri Haab’s E3 kit.
– Copper Sulfate: Commonly sold as a root killer and can be purchased from local hardware stores. It can also be purchased through a variety of online electroplating supply stores such as Rio Grande.
– Replenishing brightener: Midas also sells a replenishing brightener solution can be added to the plating bath to maintain the bath’s ability to produce a bright finish.
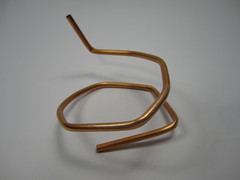
– Some copper metal: The positive lead from your DC power supply connects to a piece of copper metal that is submerged in the plating bath, this can be a solid piece of sheet copper or a rod that can be bent in a spiral to fit the shape of your plating container.
– A container: Depending on the shape and size of the objects you plan to plate you’ll want to select a container for plating in. This container should be of a material that will not contaminate the solution, nor be affected by the solution’s corrosive properties. Transparent glass containers work well since they also allow you to better see the object you are plating.
– Alligator clips: You will need alligator clips or similar to connect from the leads of your power supply to the copper rod as well as to the object you are plating.
– Conductive paint: some other recipes I read said that they were plating objects coated in carbon paint but I could not get it to work well for me. Silver paint is not as cheap as carbon, but the water-based silver paint WB-101 from Conductive Compounds worked best for me.
– Some Fimo: or another kind of polymer clay.
– An oven: a toaster oven will work too.
– Some components: to include in your circuit.
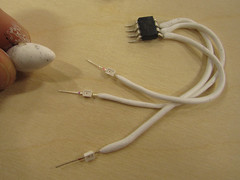
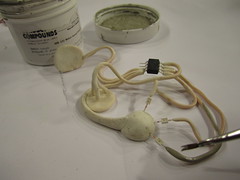
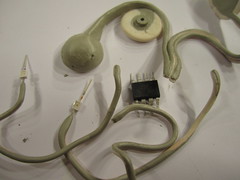
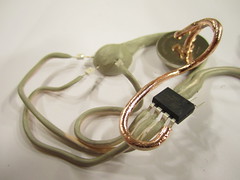
Sculpting your circuit
For sculpting you circuitry you can choose from a variety of polymer clays and their firing or hardening methods. The following steps describe in detail the process of molding Fimo, an acrylic clay that can be fired at a low temperature in an oven or toaster oven for half an hour. Benefits of the low firing temperature are that you can fire your sculpted circuit containing certain electronics components without destroying the electronics, also it cools quickly and you can continue to work with it as soon as it has cooled down. After firing, the clay is firm, yet flexible and can withstand the etching properties of the plating bath. Other, more porous clays need to be sealed before plating them if their substance is affected either by liquid or the acid of the plating bath. For shaping your circuitry you might also like to keep a selection of common sculpting tools at hand, such ribs, needles, knives and rolling pins as well as a surface for working on.
To begin sculpting the Fimo start by rolling and kneading your clay in your hands, warming it up to make it more workable. As you shape the material you can incorporate various electronics as you go. You can do this by sculpting clay around them or by pressing them into the clay. As you work the clay into it’s final form you need to plan where the connections between your electronics will run so that they match the connections in your circuit diagram.
Firing
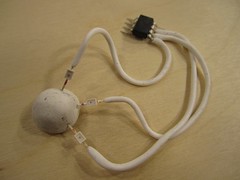
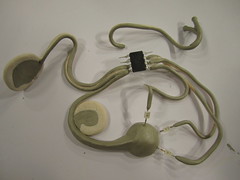
When your Fimo sculpture is finished it can be fired in your oven or even in a toaster oven. Check the packaging for precise instructions on what temperature and for how long you should fire your piece. The Fimo that I used could be fired at 110°C for 30 minutes, at this temperature you can fire most electronics with the clay and not damage them. Fimo softens as it heats up in the firing process and this might affect the structure of your piece. Depending on what you have sculpted you might need to create some support structures out of toothpicks or similar materials that can withstand the heat of the firing process. Right after firing the Fimo is hot and still soft, leave it to cool before proceeding.
Use a knife to separate any parts that might have connected.
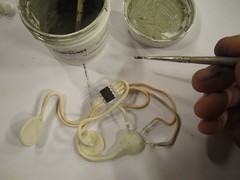
Applying conductive paint
The copper sulfate plating bath is also an etchant. If the object you want to plate is of a material that might be affected by the etching properties then you first want to seal it with a layer of varnish. For this you can use a whole range of products, for smaller objects one of the most convenient options is to use nail varnish, since it also dries relatively quickly.
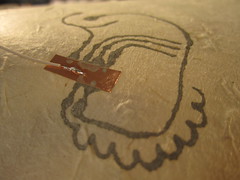
In order for the copper to selectively plate to areas that you would like it to, you first need to make the surface of your object electrically conductive in these areas. While there are a variety of different conductive paints that can be applied to various surfaces, I had the most success using a water based silver paint WB-101 from Conductive Compounds. You can thin the paint with water and with a paintbrush apply a single layer to the areas of the object you wish to plate. Paint selectively, but keep in mind that when you go on to plate these areas, if they are not interconnected then you need to connect separately to each of them.
There are some things you can do to get around having to make multiple connections or to plate each separate conductive area one at a time. One solution is to have all your conductors meet in an area that you can later cut away or remove. A trick for this is to use a piece of copper tape that you can stick to the surface of the object and have the conductive paint connect to it by painting on top of it. After the plating is done you can score the copper metal buildup around the tape and then peel it off.

Another variation of this approach is to superglue a wire to the surface of the object you are plating and to then paint on top of it with the conductive paint. Be careful not to completely coat the wire in superglue, otherwise you create an isolating layer and the wire and the pint will not be electrically connected.
Another solution is to use multiple alligator clips to interconnect all your separate conductors to the cathode of your rectifier. Beware that alligator clips and any other metal items that get in contact with the plating solution will corrode over time unless you rinse and dry them after use.
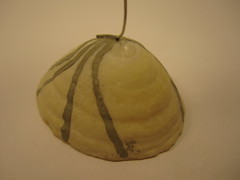
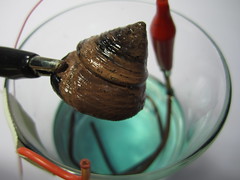
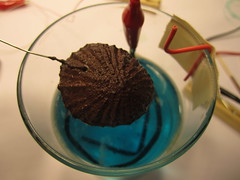
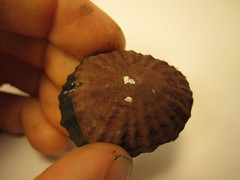
The following images show a seashell coated in carbon paint. The plating attempts were less successful than with the silver paint. While in the image on the left the homemade plating bath did not achieve a nice layer of copper, it did apparently coat almost the entire shell. In the image on the right the shell only plated close to there the alligators clips were attached, even after being left in the plating bath for longer periods of time. Most likely the copper paint that I was using had too high a resistance.
Plating bath
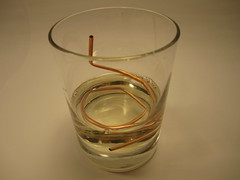
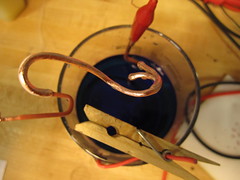
You want your plating bath to be in a container suitable to the size of the object you are plating as well as the piece of copper metal that will be your anode in the plating process. If you are using a rod then you can bend it in the shape of your container so that it surrounds the object you are plating as shown here.
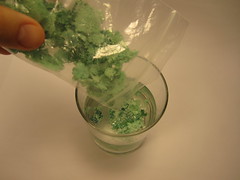
When I first started electroplating I was set on making my own plating bath. I had read on various online tutorials that it is possible to create the plating solution yourself. When etching copper fabric in slat and vinegar the solution turns green and crystallizes as it is left to dry. I had been saving these crystals because they are poisonous and should not be poured down the drain. Reading up on copper sulfate it sounded like these crystals were a form of copper sulfate that I could dilute in water to make a plating bath. The following images show my attempt at diluting the crystals and plating a coin. This was not successful, though I am not sure of the exact reasons, I suspect is might have to do with the purity of the solution.

The second homemade solution I tried making was to dissolve citric acid in distilled water. After noticing that it did not work, I ran low voltage across two copper electrodes for a while until the solution turned turquoise. I proceeded to plate in this turquoise bath and my attempts were finally somewhat successful.
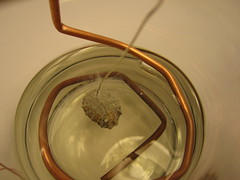
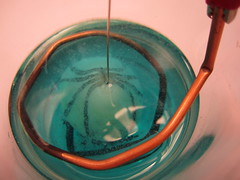
The problem was that the copper buildup was very rough and looked like it was rusting as it was plating as seen in the following pictures. Whatever copper buildup I achieved would wash away under running water.
After all these unsuccessful attempts at creating my own plating solution I finally ordered some professional Midas copper sulfate jewelry plating solution from Rio Grande as well as a bottle of replenishing brightener and these worked wonderfully. The following procedures were all done with this commercial plating solution.
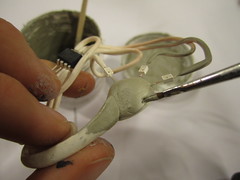
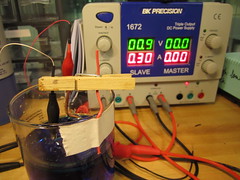
Power settings and connections
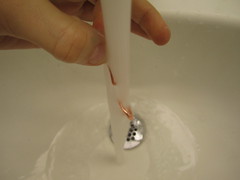
Set your rectifier to supply a very low voltage, less than 1 Volt and do not limit the current. Connect the copper metal (Anode) to the positive pole of your rectifier. And the object you are plating (Cathode) to the negative pole of your power supply. If you look up the copper plating process online you will find lots of illustrations that indicate what to connect to what as well as what exactly is happening with the copper electrodes in the plating bath.
Submerge the object completely in the plating bath and make sure the areas coated in silver paint do not touch the copper anode. When the plating process begins it will draw current and if your rectifier has a display then you can watch the amount of current it draws increase. Check the object within the first minute to insure it is plating, if all is going well then you should see a tint of copper forming on top of the silver paint.
Continue to plate the object until you’re satisfied with the copper layer. This might take anywhere from a few minutes to much longer, depending on the size and conductive surface area of your object. If the copper does not look shiny you can add a few drops of the brightener solution to the bath.
When the plating is complete, remove the object and rinse thoroughly with water to remove all of the copper sulfate solution. Copper sulfate is poisonous so make sure not to get it in your mouth or in contact with any utensils that you use for food!
Rinse!
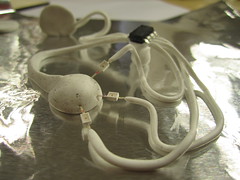
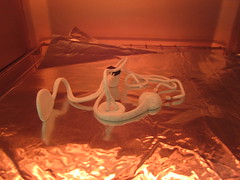
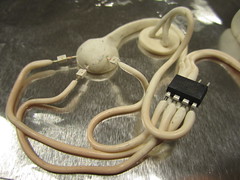
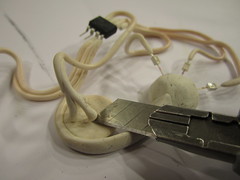
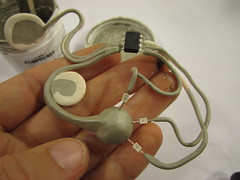
Re-assembling the circuit
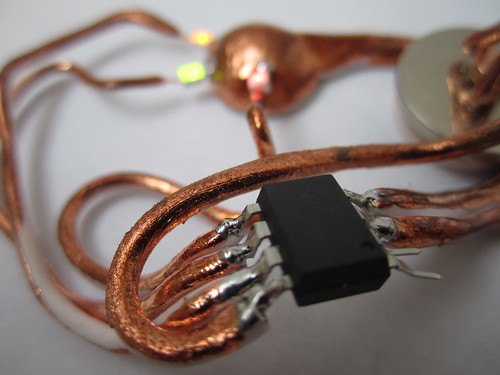
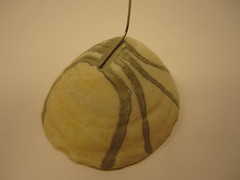
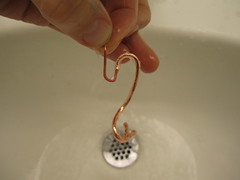
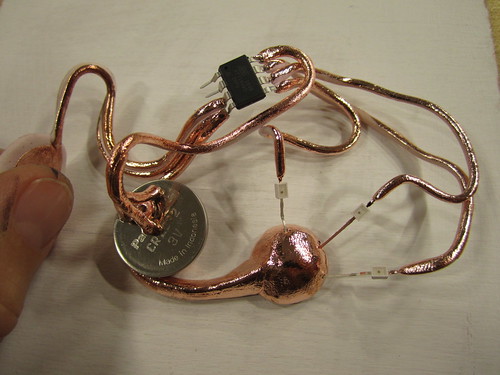
You can begin to reassemble the plated pieces of your circuit. The great thing about plating is that you build up a layer of copper metal that you can then solder to, creating extremely robust connections.
I decided to add a magnet so plated it again after inserting magnet.
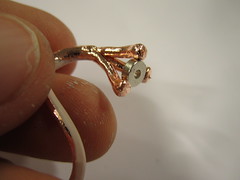
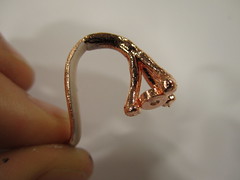
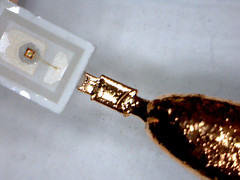
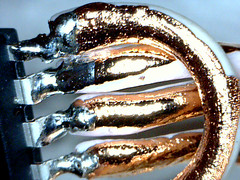
Close-up images taken with a USB microscope of the soldered connections to the microcontroller as well as the plated connection to an LED.
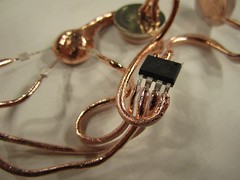
The final result
The following images show the final result as well as close up images taken with a DinoLite USB microscope. While the connections to the microcontroller were soldered, the connections to the LED lights were painted and then plated. You can see how to the right side of the LED the plated copper seamlessly covers the Fimo as well as the right led of the LED.
Video
Notes
Besides sculpting and plating acrylic clay you can also plate a variety of other objects. Including seashells, and even flexible and porous materials such as paper and fabric. When plating on slick surfaces your copper traces will easily come off the surface. Though I have not done this (yet), you could use this feature to cast circuit elements off of existing structures. A process in which the electroplated metal is self-supporting and can be removed for the base structure is called electroforming.
Links
In learning how to successfully plate copper circuits I found the following instructions and documentation most helpful.
Sherri Haab’s website contains extensive and well-prepared PDFs on how to plate natural materials for jewelry. She also sells kits and supplies that include her own electroplating regulated direct power supply.
E3 Etching Kit >> http://www.sherrihaab-shop.com/craft-supplies/metal-etching/e3-etch.html
The following two publications by Oppi Untract contain great information about all the materials and tools involved in electroplating as well as on the process and variations of it such as electroforming. “Metal Techniques for Craftsmen” and “Jewelry: Concepts and Technology”. You can view parts of the books online through Google books.
>> http://www.amazon.com/Jewelry-Concepts-Technology-Oppi-Untracht/dp/0385041853#reader_0385041853f
A great Instructable by Maggie Js:
Instructable >> http://www.instructables.com/id/Electroforming-an-Iris-Seed-Pod/
I was really encouraged to try electroplating after seeing and reading Cassy Muronaka’s blog post on electroplating with Sherri Haab’s E3 kit.
Cassy Muronaka’s blog post >> http://cassymuronaka.wordpress.com/2010/08/09/easy-electroforming-with-e3-etch-2/


[…] Sculpted & Plated Traces […]
How does electroplating, utilizing electrodepositing to transfer metal ions, coat conductive objects, and what is the role of the power supply? Regard Telkom University